Yesterday I made a decision - I think that (much like on other blogs that I have read) I need to do something nice or slightly crafty (or normally a bit of both!) every day. Even if what I can do is only for a few minutes.
This kind of spurred me into action towards getting my Christmassy table runner finished. It's still not completely done but it's getting there. My little creative and (ok so I didn't massively enjoy it but) fun thing to do yesterday was to work on getting this nearer to completion.
I finally got around to adding the tassels! I found an idea for how to make them online and then thought I would give it a go. It's kind of like making a pom pom but not so round. I have tried to take a few photo's as I went along so it might not be a perfect guide on how to make them but it gives you an idea - here goes - I'm sorry for the slightly blurry photo's, I've been feeling a little shaky recently:
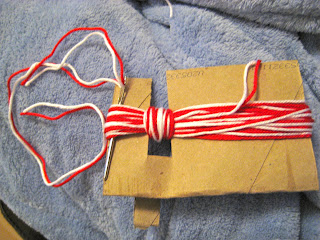
Get a piece of card and cut to into a rectangle with the longest side to be the length that you want your tassel. (I used an old toilet roll - not very glamorous but it did the job!) Cut two slits in the cardboard at one end - this will be where we secure the strands together and the pom pom-y bit starts. Once you have the card ready you can start to wrap around your chosen colour for your tassel.
Keep winding until the tassel becomes the correct thickness. We can then start to secure the strands together. Do this by winding your yarn to the bit where you cut the slit in the card and starting to wrap around the strands that you have just made.
Wind this quite tightly so that all of the strands are secured together and the "knot" is the correct thickness.
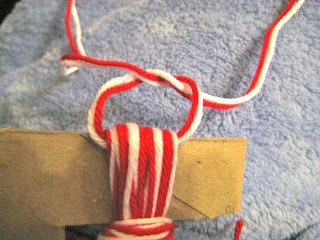
Then we cut our yarn leaving enough length just to thread this down through the "knot" and become the correct length to reach the end of the cardboard. You can always cut this down later if it ends up too long though.
Secure the top of the tassel with a knot through the top. Thread your needle through being careful to catch all of the loops as you go through and tie together tightly. If you cut this length long enough you can also use this thread to attach the tassel to the chosen item.
Finally cut along the end of the cardboard (the end that is furthest from the knot) to release the pom pom part and slide the top away from the card.
I repeated this whole process again to make two tassels - checking as I went along that both appeared to be the same thickness with the same sized "knot" part way down.
I love the way that these have turned out and like the way the runner looks on the (now slightly Christmassy) coffee table. All I have left to do is sew on some stars and maybe some Christmas trees in green too.
I have had a lot of work to do today so haven't managed much in the way of crafty-ness today however I think my husband might be catching the bug - he has stamped and water painted this image tonight so that we can make it into a Christmas card for someone. I have a horrible feeling I am now about to be drafted in to help with the rest of it!


No comments:
Post a Comment